Showing posts with label Bread. Show all posts
11.21.2011
Bread, My Love
I was all set to do a post about preparing the home for Thanksgiving where I was going to tell you how Tim and I got serious on our clutter this weekend, but then bread happened. Yes, bread.
As I told you we would, we spent Saturday morning acting like tourists around downtown Cincinnati, snapping pictures of Findlay Market and then of the incredible gardens at Krohn Conservatory. Tim teased me a little bit, calling me the paparazzi, but once I handed the camera over to him at the Conservatory to take photos of the Orchid House, he started to really get into taking pictures. I think he took a picture of every single orchid in the installation. Every. Single. One.
When we got home, Tim settled in to watch college football and I took up my post in the kitchen, experimentally baking, as I told you I would. My lofty dream of re-creating a family favorite dessert went south--quickly--as just about everything went wrong. Then I mixed up the dough for gluten-free, egg-free baguettes and that seemed to flop as well. My pre-ground flax, when mixed with water, wasn't gelling the way it was supposed to do and the dough was off. It wasn't until I baked up some gluten-free, vegan, soy-free chocolate chip blondies that I felt like I was getting my baking mojo back. I was ready for round two of bread-making.
I followed the directions on the Artisan Bread in 5 Blog exactly as written, even grinding my own whole flax seed to fine powder for an egg-replacer, and said a small prayer over the mixing bowl. As we waited for it to rise, we tackled some clutter (all inspired by Tracy's post on the Homefries blog) by decluttering the living room bookshelf and then emptying out our cabinet with the lazy-susan and ridding ourselves of half full bags of dried cranberries. It felt great to tame our overflowing cabinet, and as a reward for our efforts, the universe cooperated, allowing the stars to align, and our dough rose perfectly.
After we chilled it, formed the baguette shapes (a delicate procedure when working with somewhat goopy, squishy gluten-free dough), and let them rest for another 40 minutes, I finally popped them into a hot oven to bake.
The house smelled like warm, yeasty bread. A smell so missed that I think I had hidden my longing for it deep inside so that even I couldn't recognize it until the smell of a bread I could actually eat awoke it. I could only think, Oh bread, my love, this is our reunion!
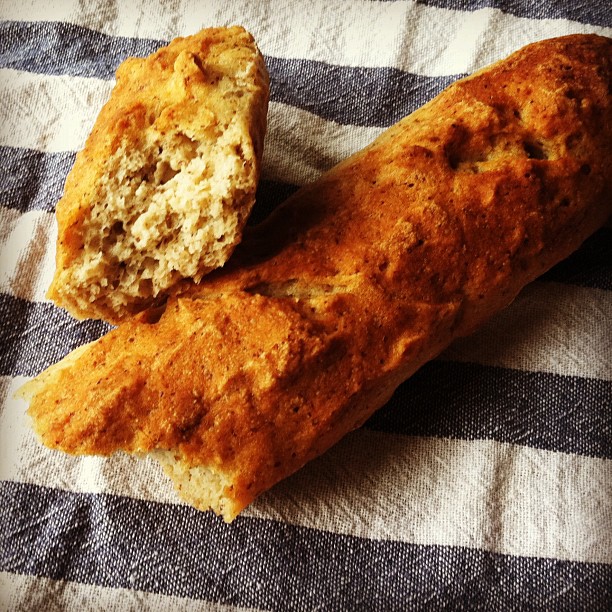
It's been over 5 weeks since I've eaten bread that even remotely reminded me of bread. This bread was divine. Even Tim said that it was so similar to traditional bread that he was pleasantly surprised. The outside was firm and crisp, the inside was slightly fluffy with a little bit of the trademark bready chew.
Should you decide to make this bread for yourself or a gluten-free loved one, I do have a few tips. Wait until the bread has cooled completely before eating it. If you break it open too soon, the inside might be a little squishy. It tastes perfectly wonderful at room temperature and has more traditional bread-like structure. Also, I didn't top it with the seeds as shown in the original recipe, but I think seeds would be an excellent addition to the bread. Lastly--and this is the most important--you can't swap out any of the ingredients and expect the same result. For the best gluten-free bread, use the King Arthur Flour mixes exactly as listed. I can purchase KAF Gluten Free Multi-Purpose Flour at Whole Foods and possibly my local supermarket, but I had to order the KAF Ancient Grains Flour from the KAF website.
Happy baking!
(And if you missed it, you can find the recipe with step-by-step photos for Gluten-free, Egg-free Baguettes here.)
10.04.2010
Challah!
It's kind of a running joke amongst my college friends about how incredibly interested I have always been with Jewish traditions. It's mostly because three of my college roommates were Jewish and what was important to them was important to me. That's how I am with my friends, and that's how they are with me.
I met my friend Lia during the second semester of my freshman year of college. We had just joined the same sorority and realized we lived in dorms next door to one another. One spring afternoon in March, she suggested that we have dinner together. I brought sandwiches and she brought a blanket and we laid in the grass between our dorms and chatted. It was the perfect first (friend) date.
I quickly discovered we had very little in common. She was an east coaster and the daughter of a Rabbi. She had this way about her that looked like she just sort of tossed an outfit together, tousled her hair, and didn't even bother with make-up. And here I was, a confused Lutheran from no-where Ohio who actually tried very hard to pull myself together. Yet, she liked me, and I liked her.
Since then, she's traveled throughout the world, experiencing other cultures, participating in service organizations, and bringing that message back home to share with others. She helped build a school in Africa; she studied abroad in Israel; and she's traveled all over southeast Asia. The stories she shared with me about Thailand were the best after-two-or-three-glasses-of-wine stories I've ever heard in my life. I, on the other hand, stayed in Ohio, married a wonderful man, and have settled into a comfortable routine. Despite that, I enjoy every moment my friend is around and hope that she will continue to be what I like to think of as my Jewish Ambassador, teaching me to keep my mind open.
I owe her a lot for teaching me that.
In return, I have little to offer except my friendship and support. Though, I hope to make her proud when she sees this challah that I made.
There were a few challenges. The first was the whole braiding thing. I consulted a few recipes for information about how important the braid is, and frankly I think you can skip the braid and put the bread into loaf pans. But then how challah-like will this bread really look? I wanted to achieve the overall affect.
You can do a round braid, but that might be something to try next time. Just figuring out how to achieve the braid was confusing enough (and required consulting a handful of youtube videos), but really it's just like braiding long hair.
The recipe I ended up using from Epicurious did say that if it was getting too dark that you should tent it with foil. When I checked the bread halfway through it looked fine, but in retrospect I probably could have tented it then. Don't be deceived though--the bread isn't burnt (not even the bottom) and I felt like the dark crust gave it complexity.
Then again I'm a challah novice, so use your own judgment.
Finally, as suggested by Lia herself in the comments of my last post, I decided to try out using challah as French toast. I mixed a few eggs, some milk, and spices in a square baking dish and then put in it a few pieces of sliced challah to soak a minute or two on each side. Then I fried them a few at a time on each side in a tablespoon of vegetable oil in a hot skillet. My husband always used a hot griddle to make French toast and pancakes before he met me, but I think the oil is necessary to add a little crispness around the edges of the bread. He completely agrees.
Then, to mimic my epic French toast brunch at Donna's in Baltimore last weekend, I whipped up an Apple & Raisin compote, which ended up more like a syrup, and a few over easy eggs.
It was really good. The thick egginess of the challah makes a perfect French toast. It stays dense but soft on the inside and the dark crust gives a little texture, but not too much. The challah is already a teensy bit sweet, and I think that was a nice compliment to the apples and raisins, both of which are also sweet but not overtly.
Today I'd like to offer the recipe for the Apple & Raisin Compote rather than the challah, mostly because the challah was time consuming and require a lot of planning ahead. If you'd like to make this challah, go ahead and pull the recipe from Epicurious. It were clear and easy to follow but a lot of steps. Or you could just grab a loaf of challah from the grocery--no one will ever know.
Apple & Raisin Compote
adapted from The Sugar Association via cooksrecipes.com
makes about 2 cups
I think that this compote could easily be put on top of ice cream, pork tenderloin, and a whole host of other foods. To make it more savory, add some peanuts or even some sautéed diced onion. If you come up with a great variation, share it with me! Also, for softer, plumper raisins, soak them in the brandy for about 10 to 15 minutes, removing them from the liquid before you add the brandy to the pan. Then follow the instructions to add the raisins towards at the end.
4 tbsp unsalted butter
3-4 tart apples, cored and sliced
1/2 cup dark brown sugar
3 tbsp brandy
1/4 tsp ginger
1/4 tsp nutmeg
1/4 tsp cinnamon
1/3 cup golden raisins
In a large saucepan, melt the butter over medium heat. Add apples and cook for about 3 minutes, so that apples are still slightly crisp but can be pierced with a fork. Remove apples from pan and set aside in a bowl.
Increase the heat to medium-high and add the brandy, dark brown sugar, and spices. Reduce heat to medium-low and simmer for 2-3 minutes, or until mixture thickens slightly, stirring occasionally. Return the apples to the pot and add raisins. Cook until the raisins and apples are heated through.
Serve warm over French toast (or any other foods you'd like to eat it on!).
I met my friend Lia during the second semester of my freshman year of college. We had just joined the same sorority and realized we lived in dorms next door to one another. One spring afternoon in March, she suggested that we have dinner together. I brought sandwiches and she brought a blanket and we laid in the grass between our dorms and chatted. It was the perfect first (friend) date.
I quickly discovered we had very little in common. She was an east coaster and the daughter of a Rabbi. She had this way about her that looked like she just sort of tossed an outfit together, tousled her hair, and didn't even bother with make-up. And here I was, a confused Lutheran from no-where Ohio who actually tried very hard to pull myself together. Yet, she liked me, and I liked her.
Since then, she's traveled throughout the world, experiencing other cultures, participating in service organizations, and bringing that message back home to share with others. She helped build a school in Africa; she studied abroad in Israel; and she's traveled all over southeast Asia. The stories she shared with me about Thailand were the best after-two-or-three-glasses-of-wine stories I've ever heard in my life. I, on the other hand, stayed in Ohio, married a wonderful man, and have settled into a comfortable routine. Despite that, I enjoy every moment my friend is around and hope that she will continue to be what I like to think of as my Jewish Ambassador, teaching me to keep my mind open.
I owe her a lot for teaching me that.
In return, I have little to offer except my friendship and support. Though, I hope to make her proud when she sees this challah that I made.
There were a few challenges. The first was the whole braiding thing. I consulted a few recipes for information about how important the braid is, and frankly I think you can skip the braid and put the bread into loaf pans. But then how challah-like will this bread really look? I wanted to achieve the overall affect.
You can do a round braid, but that might be something to try next time. Just figuring out how to achieve the braid was confusing enough (and required consulting a handful of youtube videos), but really it's just like braiding long hair.
The recipe I ended up using from Epicurious did say that if it was getting too dark that you should tent it with foil. When I checked the bread halfway through it looked fine, but in retrospect I probably could have tented it then. Don't be deceived though--the bread isn't burnt (not even the bottom) and I felt like the dark crust gave it complexity.
Then again I'm a challah novice, so use your own judgment.
Finally, as suggested by Lia herself in the comments of my last post, I decided to try out using challah as French toast. I mixed a few eggs, some milk, and spices in a square baking dish and then put in it a few pieces of sliced challah to soak a minute or two on each side. Then I fried them a few at a time on each side in a tablespoon of vegetable oil in a hot skillet. My husband always used a hot griddle to make French toast and pancakes before he met me, but I think the oil is necessary to add a little crispness around the edges of the bread. He completely agrees.
Then, to mimic my epic French toast brunch at Donna's in Baltimore last weekend, I whipped up an Apple & Raisin compote, which ended up more like a syrup, and a few over easy eggs.
It was really good. The thick egginess of the challah makes a perfect French toast. It stays dense but soft on the inside and the dark crust gives a little texture, but not too much. The challah is already a teensy bit sweet, and I think that was a nice compliment to the apples and raisins, both of which are also sweet but not overtly.
Today I'd like to offer the recipe for the Apple & Raisin Compote rather than the challah, mostly because the challah was time consuming and require a lot of planning ahead. If you'd like to make this challah, go ahead and pull the recipe from Epicurious. It were clear and easy to follow but a lot of steps. Or you could just grab a loaf of challah from the grocery--no one will ever know.
Apple & Raisin Compote
adapted from The Sugar Association via cooksrecipes.com
makes about 2 cups
I think that this compote could easily be put on top of ice cream, pork tenderloin, and a whole host of other foods. To make it more savory, add some peanuts or even some sautéed diced onion. If you come up with a great variation, share it with me! Also, for softer, plumper raisins, soak them in the brandy for about 10 to 15 minutes, removing them from the liquid before you add the brandy to the pan. Then follow the instructions to add the raisins towards at the end.
4 tbsp unsalted butter
3-4 tart apples, cored and sliced
1/2 cup dark brown sugar
3 tbsp brandy
1/4 tsp ginger
1/4 tsp nutmeg
1/4 tsp cinnamon
1/3 cup golden raisins
In a large saucepan, melt the butter over medium heat. Add apples and cook for about 3 minutes, so that apples are still slightly crisp but can be pierced with a fork. Remove apples from pan and set aside in a bowl.
Increase the heat to medium-high and add the brandy, dark brown sugar, and spices. Reduce heat to medium-low and simmer for 2-3 minutes, or until mixture thickens slightly, stirring occasionally. Return the apples to the pot and add raisins. Cook until the raisins and apples are heated through.
Serve warm over French toast (or any other foods you'd like to eat it on!).
9.24.2010
On Sleeplessness and Overripe Bananas
This morning at 4:45 a.m., after an hour of begging my body to return to sleep, I gave in to my sleeplessness. I wandered out into the kitchen, fed the dogs, and pondered how to make myself useful until the sun came up. TiVo, my trusted digital friend, had last night's episode of Private Practice as well as the Top Chef Reunion Show to offer me, but it was really the brown, nearly wrinkled bunch of bananas on the counter that I kept coming back to.
Why not bake at 5:00am? I mean, I am sure mad scientist type things happen in the early hours of the morning. Sure, I was a bit groggy having only had a couple of hours of sleep, but baking seemed like the perfect thing to take my mind off of all of the reasons I wasn't able to sleep.
You see, with baking there is a lot of precision and focus involved. You can't just toss this and that in a bowl and presto!, you have something tasty. With baking I have to concentrate, thoroughly read the instructions, consult several recipes to figure out how to most safely transform Banana Walnut Bread into Banana Chocolate Chip Muffins. While I was doing that I wasn't thinking about how the dogs were going to be boarded this weekend and probably wouldn't eat the entire time. And I wasn't at all concerned about the changes going on at my office that will inevitable affect what role I play in my company. Oh, and I for sure wasn't thinking about missing my stepdaughter's parade on Saturday because we have other commitments we made months ago. It's just complicated being an adult, and that's when overripe bananas and a few cookbooks really come into play.
Overripe bananas are uncomplicated and practically hang around forever before you can't use them. In fact, my recipe specifically said the riper the better. So I suppose all of the breakfasts this week where I intended to eat a banana but instead went flying out the door late for meetings and all of the afternoon snacks of bananas and peanut butter that I meant to eat but just ran out of time trying to coordinate taking care of all of the things in my life--well, they all led up to these amazing Banana Chocolate Chip Muffins.
The smell of them wooed my husband out of bed before I even pulled them out of the oven around 6:30 a.m. As he pulled one of the warm muffins apart to see the oozing chocolate chips on the inside he said, "So this is what life would be like if you were a stay at home wife."
Truthfully, I'd probably still have sleepless nights with a lot of things to think about. That's just me. At least I know that some quiet time in the kitchen will help me work through it.
Banana Chocolate Chip Muffins
recipe adapted from The Complete America's Test Kitchen TV Show Cookbook and Better Homes and Gardens New Cookbook
makes 12-15 muffins
The muffins will end up somewhere between a banana bread and a breakfast muffin. They were sweet, but not overly sweet. If you'd rather them be more sweet, punch up the sugar. If you only have yogurt and no sour cream--just use all yogurt. If you like a pronounced contrast between sweet and salty, use salted butter. If you'd rather have walnuts than chocolate chips, be my guest to make that swap. Craisins sound mighty fine too.
2.5 cups all purpose flour
1 tsp baking powder
1.5 tsp baking soda
1/2 tsp salt
2 eggs, lightly beaten
3 very ripe bananas, well-mashed
2 tbsp plain yogurt
2 tbsp sour cream
1 tsp vanilla
6 tbsp unsalted butter, melted and cooled
2 tbsp vegetable oil
1/2 cup chocolate chips
Preheat oven to 350 degrees F. Spray a muffin pan with non-stick spray and set aside. In a large bowl whisk together flour, baking powder, baking soda, and salt and set aside. In a medium bowl, combine eggs, bananas, yogurt, sour cream, vanilla, melted butter, and vegetable oil. Mix well. Fold banana mixture and chocolate chips into the flour mixture. Be careful not to overmix.
Fill muffin wells 3/4 full. Bake on the middle rack for 20-22 minutes. Check for done ness. If a toothpick comes out clean, then they are done. If toothpick seems wet, bake for an additional 2 to 3 minutes and re-check. Allow muffins to cool in pan for 10 minutes, and then transfer to a rack to cool.
Eat warm or room temp.
Why not bake at 5:00am? I mean, I am sure mad scientist type things happen in the early hours of the morning. Sure, I was a bit groggy having only had a couple of hours of sleep, but baking seemed like the perfect thing to take my mind off of all of the reasons I wasn't able to sleep.
You see, with baking there is a lot of precision and focus involved. You can't just toss this and that in a bowl and presto!, you have something tasty. With baking I have to concentrate, thoroughly read the instructions, consult several recipes to figure out how to most safely transform Banana Walnut Bread into Banana Chocolate Chip Muffins. While I was doing that I wasn't thinking about how the dogs were going to be boarded this weekend and probably wouldn't eat the entire time. And I wasn't at all concerned about the changes going on at my office that will inevitable affect what role I play in my company. Oh, and I for sure wasn't thinking about missing my stepdaughter's parade on Saturday because we have other commitments we made months ago. It's just complicated being an adult, and that's when overripe bananas and a few cookbooks really come into play.
Overripe bananas are uncomplicated and practically hang around forever before you can't use them. In fact, my recipe specifically said the riper the better. So I suppose all of the breakfasts this week where I intended to eat a banana but instead went flying out the door late for meetings and all of the afternoon snacks of bananas and peanut butter that I meant to eat but just ran out of time trying to coordinate taking care of all of the things in my life--well, they all led up to these amazing Banana Chocolate Chip Muffins.
The smell of them wooed my husband out of bed before I even pulled them out of the oven around 6:30 a.m. As he pulled one of the warm muffins apart to see the oozing chocolate chips on the inside he said, "So this is what life would be like if you were a stay at home wife."
Truthfully, I'd probably still have sleepless nights with a lot of things to think about. That's just me. At least I know that some quiet time in the kitchen will help me work through it.
Banana Chocolate Chip Muffins
recipe adapted from The Complete America's Test Kitchen TV Show Cookbook and Better Homes and Gardens New Cookbook
makes 12-15 muffins
The muffins will end up somewhere between a banana bread and a breakfast muffin. They were sweet, but not overly sweet. If you'd rather them be more sweet, punch up the sugar. If you only have yogurt and no sour cream--just use all yogurt. If you like a pronounced contrast between sweet and salty, use salted butter. If you'd rather have walnuts than chocolate chips, be my guest to make that swap. Craisins sound mighty fine too.
2.5 cups all purpose flour
1 tsp baking powder
1.5 tsp baking soda
1/2 tsp salt
2 eggs, lightly beaten
3 very ripe bananas, well-mashed
2 tbsp plain yogurt
2 tbsp sour cream
1 tsp vanilla
6 tbsp unsalted butter, melted and cooled
2 tbsp vegetable oil
1/2 cup chocolate chips
Preheat oven to 350 degrees F. Spray a muffin pan with non-stick spray and set aside. In a large bowl whisk together flour, baking powder, baking soda, and salt and set aside. In a medium bowl, combine eggs, bananas, yogurt, sour cream, vanilla, melted butter, and vegetable oil. Mix well. Fold banana mixture and chocolate chips into the flour mixture. Be careful not to overmix.
Fill muffin wells 3/4 full. Bake on the middle rack for 20-22 minutes. Check for done ness. If a toothpick comes out clean, then they are done. If toothpick seems wet, bake for an additional 2 to 3 minutes and re-check. Allow muffins to cool in pan for 10 minutes, and then transfer to a rack to cool.
Eat warm or room temp.
7.27.2010
The Itch to Do Something
Out of nowhere, I get this itch in my fingers and toes to do things. Once on a whim I went camping with a friend in January. It was somewhat warm during the day but incredibly cold at dark. I shivered the entire night.
Another time I picked up and drove to Chicago on New Year's Eve. I danced until after midnight, then walked with no jacket and high heels around Wrigleyville spreading some New Year's cheer with my girlfriends until well after 4:00 am. It was my second best New Year's Eve (my best was my engagement to Tim).
In our first apartment, I decided Tim and I should do some painting. We picked out the colors and spent an entire day putting coat after coat on the plaster wall. I even have the before and after of that room.
Before:
After:
I think the color made an impact. We loved that little apartment--listening to vinyl, playing dominoes, and it's also where Tim proposed to me--right in front of that window on New Year's Eve.
We learned to cook together in that apartment, too. I give a lot of credit to Tim, who had a little more experience in the kitchen than me. He can whip up a mean Tuesday night stir fry. I did my part by perfecting the art of meatloaf. I heard on The Splendid Table radio program that you should make meatloaf the way you'd make a meat ball with lots of fresh herbs. So that's what I do, and my meatloaf is fantastic.
While we lived at that apartment, Tim took a job as the morning baker at a local store so that he could finish up his degree in the evening. He would toss his work clothes in the laundry basket and when I did laundry I would smell the flour and freshly baked bread on his shirt.
He usually does the bread baking at our house but this weekend I got that itch where I needed to bake. I browsed our cookbooks and some of the magazine clippings I have in a file, but nothing was standing out to me. I was in search of the perfect bread to make a fancy grilled cheese ala Courtney at Epi-ventures. Remembering that I had such success with a basic pie dough from Williams-Sonoma when I made my Tomato and Roasted Eggplant Pie, I decided to check out their website for a recipe.
I found a recipe for Rosemary-Olive bread that was closest to what I was looking for, but there were a few problems. The first is Tim doesn't really love olives, so I decided to make some roasted garlic cloves to put in the bread instead. The other is that I don't have a stoneware baker. That was going to be trickier to substitute.
I was shocked at how huge the dough was after it rose twice. I had originally planned on putting it in a loaf pan to make it easier for slicing, but it was never going to fit. I made a quick decision. The original stoneware baker that the recipe called for was covered, so I needed a big, oven-safe pot with a lid that I could bake the bread in. I pulled out my dutch oven, greased it, and decided to take a leap of faith.
This risk definitely paid off--the bread was beyond my expectations. It was light and fluffy with great rosemary flavor. The roasted garlic cloves were like bursts of garlic flavor in a bite but didn't overwhelm the bread.
Our fancy grilled cheese sandwiches with Ludlow cheese from Blue Jacket Diary were creamy and crispy, just like a grilled cheese should be. We had slices of the bread along side grilled chicken and summer squash the next night with just a little butter on them and it was still great.
It took a lot of steps to make the bread, but if you want to have a huge loaf of bread for a dinner party or for sandwiches, I'd recommend this. It would save you a step if you purchased pre-roasted garlic, but where's the adventure in that?
Rosemary & Roasted Garlic Bread
recipe adapted from Williams-Sonoma
Ingredients for the Roasted Garlic
recipe from Bon Appétit, October 2006 via Epicurious
20 large garlic cloves, unpeeled
1 tbsp olive oil
1 tbsp water
pinch each salt & pepper
Preheat oven to 400 degrees F. Toss all ingredients together in a small oven proof pan. Cover pan tightly with foil. To use for adding to the bread, bake garlic until tender but not mushy, about 40 minutes. If you are going to use for mashing with potatoes or as a spread, bake for 50 minutes until soft. When finished, remove foil and set aside to cool before peeling. For purposes of adding to bread dough, allow to cool completely on a paper towel.
Ingredients for the Bread
2 1/2 tbsp active dry yeast (or 1 package)
1/2 tsp sugar
2 cups warm water (110 degrees F)
5 cups bread flour, plus more for dusting
1 cup all-purpose flour
1 tbsp fresh rosemary, chopped
2 1/2 tsp salt
15-20 roasted garlic cloves
Sprinkle yeast and sugar into the warm water. Allow to stand until mixture is bubbly, about 5 minutes.
In the bowl of an electric mixer, add both of the flours, rosemary, salt, and yeast mixture. Fitted with the dough hook, knead the dough on medium until the dough is soft and smooth, about 10 minutes. Turn dough out on to a lightly floured surface and shape into a ball. Return the dough to the bowl, cover with plastic wrap or a clean towel, and let rise in a warm, dry place, like on top of a warm oven, until doubled--about 1 hour. Punch down and then let rise again until doubled, about 45 minutes.
On a lightly floured surface, press the dough flat. Press the pieces of roasted garlic into the dough so that they are evenly spaced throughout. Then stretch the sides of the dough down and under to form a tight, round shape. Pinch the seam under the dough flat. Place the loaf in a greased and floured 5 quart dutch oven (or stoneware baker). Cover with lid and let rise for 30-40 minutes.
Preheat oven to 400 degrees F. Using a serrated knife, but an X in the top of the dough. Cover and bake until the loaf is golden brown on top and sounds hollow when tapped on the bottom, about 1 hour.
Makes 1 loaf.
Another time I picked up and drove to Chicago on New Year's Eve. I danced until after midnight, then walked with no jacket and high heels around Wrigleyville spreading some New Year's cheer with my girlfriends until well after 4:00 am. It was my second best New Year's Eve (my best was my engagement to Tim).
In our first apartment, I decided Tim and I should do some painting. We picked out the colors and spent an entire day putting coat after coat on the plaster wall. I even have the before and after of that room.
Before:
After:
I think the color made an impact. We loved that little apartment--listening to vinyl, playing dominoes, and it's also where Tim proposed to me--right in front of that window on New Year's Eve.
We learned to cook together in that apartment, too. I give a lot of credit to Tim, who had a little more experience in the kitchen than me. He can whip up a mean Tuesday night stir fry. I did my part by perfecting the art of meatloaf. I heard on The Splendid Table radio program that you should make meatloaf the way you'd make a meat ball with lots of fresh herbs. So that's what I do, and my meatloaf is fantastic.
While we lived at that apartment, Tim took a job as the morning baker at a local store so that he could finish up his degree in the evening. He would toss his work clothes in the laundry basket and when I did laundry I would smell the flour and freshly baked bread on his shirt.
He usually does the bread baking at our house but this weekend I got that itch where I needed to bake. I browsed our cookbooks and some of the magazine clippings I have in a file, but nothing was standing out to me. I was in search of the perfect bread to make a fancy grilled cheese ala Courtney at Epi-ventures. Remembering that I had such success with a basic pie dough from Williams-Sonoma when I made my Tomato and Roasted Eggplant Pie, I decided to check out their website for a recipe.
I found a recipe for Rosemary-Olive bread that was closest to what I was looking for, but there were a few problems. The first is Tim doesn't really love olives, so I decided to make some roasted garlic cloves to put in the bread instead. The other is that I don't have a stoneware baker. That was going to be trickier to substitute.
I was shocked at how huge the dough was after it rose twice. I had originally planned on putting it in a loaf pan to make it easier for slicing, but it was never going to fit. I made a quick decision. The original stoneware baker that the recipe called for was covered, so I needed a big, oven-safe pot with a lid that I could bake the bread in. I pulled out my dutch oven, greased it, and decided to take a leap of faith.
This risk definitely paid off--the bread was beyond my expectations. It was light and fluffy with great rosemary flavor. The roasted garlic cloves were like bursts of garlic flavor in a bite but didn't overwhelm the bread.
Our fancy grilled cheese sandwiches with Ludlow cheese from Blue Jacket Diary were creamy and crispy, just like a grilled cheese should be. We had slices of the bread along side grilled chicken and summer squash the next night with just a little butter on them and it was still great.
It took a lot of steps to make the bread, but if you want to have a huge loaf of bread for a dinner party or for sandwiches, I'd recommend this. It would save you a step if you purchased pre-roasted garlic, but where's the adventure in that?
Rosemary & Roasted Garlic Bread
recipe adapted from Williams-Sonoma
Ingredients for the Roasted Garlic
recipe from Bon Appétit, October 2006 via Epicurious
20 large garlic cloves, unpeeled
1 tbsp olive oil
1 tbsp water
pinch each salt & pepper
Preheat oven to 400 degrees F. Toss all ingredients together in a small oven proof pan. Cover pan tightly with foil. To use for adding to the bread, bake garlic until tender but not mushy, about 40 minutes. If you are going to use for mashing with potatoes or as a spread, bake for 50 minutes until soft. When finished, remove foil and set aside to cool before peeling. For purposes of adding to bread dough, allow to cool completely on a paper towel.
Ingredients for the Bread
2 1/2 tbsp active dry yeast (or 1 package)
1/2 tsp sugar
2 cups warm water (110 degrees F)
5 cups bread flour, plus more for dusting
1 cup all-purpose flour
1 tbsp fresh rosemary, chopped
2 1/2 tsp salt
15-20 roasted garlic cloves
Sprinkle yeast and sugar into the warm water. Allow to stand until mixture is bubbly, about 5 minutes.
In the bowl of an electric mixer, add both of the flours, rosemary, salt, and yeast mixture. Fitted with the dough hook, knead the dough on medium until the dough is soft and smooth, about 10 minutes. Turn dough out on to a lightly floured surface and shape into a ball. Return the dough to the bowl, cover with plastic wrap or a clean towel, and let rise in a warm, dry place, like on top of a warm oven, until doubled--about 1 hour. Punch down and then let rise again until doubled, about 45 minutes.
On a lightly floured surface, press the dough flat. Press the pieces of roasted garlic into the dough so that they are evenly spaced throughout. Then stretch the sides of the dough down and under to form a tight, round shape. Pinch the seam under the dough flat. Place the loaf in a greased and floured 5 quart dutch oven (or stoneware baker). Cover with lid and let rise for 30-40 minutes.
Preheat oven to 400 degrees F. Using a serrated knife, but an X in the top of the dough. Cover and bake until the loaf is golden brown on top and sounds hollow when tapped on the bottom, about 1 hour.
Makes 1 loaf.
6.10.2010
The Strawberry Festival and a Strawberry Sensation
Every rose has its thorn. Every small town has its festival.
The small town I grew up in has the Strawberry Festival. It has a long history of parades, bed races, arts & crafts, and decadent strawberry creations. You can find anything from strawberry shortcake to strawberry salsa, but the real delicacy of the strawberry festival is the famous strawberry doughnuts. They are truly heaven on earth in a fried dough. It's possible. Just trust me--I'm a strawberry doughnut expert.
We traveled to Troy to watch a family member march in the parade. The rain held off and we found an excellent spot to watch the passersby.
The parade was filled with the small town usuals--pageant winners waving while perched on top of convertibles, candy being tossed into the crowd by clowns (as my father put it, "Clowns are scary," while he told the story of my sister traumatized by clowns at a circus when she was a child), and modest floats that local people put hours upon hours of time into preparing.
The day was lovely, despite the heavy humidity, and it was a taste of my childhood that I was happy to share with my new husband. There is definitely something to be said about the spirit of small towns.
The highlight of the afternoon was my discovery of one of the booths selling fresh picked local strawberries from Fulton Farm. Just outside of Troy, Fulton Farm has always been the local go-to spot for picking strawberries in the summer and pumpkins in the fall. A few times I've walked into a grocery store in Cincinnati and purchased corn on the cob that was grown by Fulton Farm. Knowing where my strawberries, corn, pumpkins, and all other foods are grown is something that has become very important to me lately. At the supermarket, I find myself checking the sticker on my produce to see how far it had to travel before it reached my basket.
As soon as we returned home from the festival, I began researching recipes for something special to make with my very special bucket of strawberries. There have been so many special strawberry recipes on the web lately like Strawberry Ricotta Graham Tartlets, Strawberry Galette with Homemade Vanilla Whipped Cream, and Salmon with Strawberry and Tomato Salsa. Any of these recipes would have done my strawberries justice, but after I happened upon a recipe for strawberry bread there was no other option that seemed as appealing.
The instructions were simple, so I added a few recommendations to it, but overall, it was perfection. I had the exactly the amount of strawberries needed for the recipe (it was a sign) and my strawberries were perfectly ripe.
Even the batter was incredibly tasty. Oh, I know--raw eggs--but I eat my eggs over easy, what's really the difference? It was very thick batter and I think the thickness kept the strawberries from sinking to the bottom of the bread.
Then I popped it into the oven, watched some television with my husband, and tried to ignore the incredible smells coming from the kitchen. I did check it once with a toothpick at 50 minutes, because I never trust an oven, but it definitely needed the additional time. A total cooking time of 60 minutes was absolutely perfect for me. I let it sit for 5 minutes in the loaf pan, then turned it out onto a wire rack to cool.
I probably could have let it cool longer in the loaf pan because it did start to pull in half a bit, so I'd suggest to you to leave it in the loaf pan for 10-15 minutes. I resisted cutting into the bread for another 5 minutes or so, but finally I couldn't stand it.
I cut a slice for me and one for Tim. The strawberries were steamy and practically melted into the bread. It had the texture of banana bread, but it was oh so much more than just a quick bread.
It was a strawberry sensation. Sour and sweet, dense but fluffy, breakfast and dessert. In this photo it appears that the strawberries sank to one side, but when I cut into the bread the next day at the other end, the strawberries were more evenly distributed. Also, the original recipe called for nuts, but I didn't have any on hand, so I left them out. I can imagine that the addition of nuts would only enhance the texture of the bread. Go with your gut here--nuts or no nuts, you will love this bread.
Strawberry Sour Cream Bread
adapted from Closet Cooking who got the recipe from Joy of Baking
Ingredients
1/2 cup unsalted butter, softened
3/4 cup granulated white sugar
3 large eggs
1 teaspoon vanilla extract
2 cups all-purpose flour
1/2 teaspoon baking powder
1/2 teaspoon baking soda
1/4 teaspoon salt
1 teaspoon ground cinnamon
1/2 cup sour cream
1/2 cup pecans or walnuts (optional)
2 cups fresh strawberries
Using a stand mixer, cream the butter and sugar. Add the eggs one at a time, beating each in until the egg is incorporated before adding the next. Beat in the vanilla.
In a separate bowl, mix the flour, baking powder, baking soda, salt, and cinnamon. With the mixer on low, add 1/3 of the dry ingredients. When that is just mixed in, add 1/2 of the sour cream. Repeat with 1/3 of the dry ingredients, then the other half of the sour cream, and the final 1/3 of the dry ingredients. Be careful not to overmix. Fold in the strawberries and optional nuts.
Pour the batter into a greased and floured 9x5 loaf pan. Bake in a preheated 350 degree F oven for 60 minutes until the top is golden brown and a toothpick poked into the center will come out clean.
Allow to cool for 10 minutes in the pan and 5-10 minutes on a wire rack before slicing.
The small town I grew up in has the Strawberry Festival. It has a long history of parades, bed races, arts & crafts, and decadent strawberry creations. You can find anything from strawberry shortcake to strawberry salsa, but the real delicacy of the strawberry festival is the famous strawberry doughnuts. They are truly heaven on earth in a fried dough. It's possible. Just trust me--I'm a strawberry doughnut expert.
We traveled to Troy to watch a family member march in the parade. The rain held off and we found an excellent spot to watch the passersby.
The parade was filled with the small town usuals--pageant winners waving while perched on top of convertibles, candy being tossed into the crowd by clowns (as my father put it, "Clowns are scary," while he told the story of my sister traumatized by clowns at a circus when she was a child), and modest floats that local people put hours upon hours of time into preparing.
The day was lovely, despite the heavy humidity, and it was a taste of my childhood that I was happy to share with my new husband. There is definitely something to be said about the spirit of small towns.
The highlight of the afternoon was my discovery of one of the booths selling fresh picked local strawberries from Fulton Farm. Just outside of Troy, Fulton Farm has always been the local go-to spot for picking strawberries in the summer and pumpkins in the fall. A few times I've walked into a grocery store in Cincinnati and purchased corn on the cob that was grown by Fulton Farm. Knowing where my strawberries, corn, pumpkins, and all other foods are grown is something that has become very important to me lately. At the supermarket, I find myself checking the sticker on my produce to see how far it had to travel before it reached my basket.
As soon as we returned home from the festival, I began researching recipes for something special to make with my very special bucket of strawberries. There have been so many special strawberry recipes on the web lately like Strawberry Ricotta Graham Tartlets, Strawberry Galette with Homemade Vanilla Whipped Cream, and Salmon with Strawberry and Tomato Salsa. Any of these recipes would have done my strawberries justice, but after I happened upon a recipe for strawberry bread there was no other option that seemed as appealing.
The instructions were simple, so I added a few recommendations to it, but overall, it was perfection. I had the exactly the amount of strawberries needed for the recipe (it was a sign) and my strawberries were perfectly ripe.
Even the batter was incredibly tasty. Oh, I know--raw eggs--but I eat my eggs over easy, what's really the difference? It was very thick batter and I think the thickness kept the strawberries from sinking to the bottom of the bread.
Then I popped it into the oven, watched some television with my husband, and tried to ignore the incredible smells coming from the kitchen. I did check it once with a toothpick at 50 minutes, because I never trust an oven, but it definitely needed the additional time. A total cooking time of 60 minutes was absolutely perfect for me. I let it sit for 5 minutes in the loaf pan, then turned it out onto a wire rack to cool.
I probably could have let it cool longer in the loaf pan because it did start to pull in half a bit, so I'd suggest to you to leave it in the loaf pan for 10-15 minutes. I resisted cutting into the bread for another 5 minutes or so, but finally I couldn't stand it.
I cut a slice for me and one for Tim. The strawberries were steamy and practically melted into the bread. It had the texture of banana bread, but it was oh so much more than just a quick bread.
It was a strawberry sensation. Sour and sweet, dense but fluffy, breakfast and dessert. In this photo it appears that the strawberries sank to one side, but when I cut into the bread the next day at the other end, the strawberries were more evenly distributed. Also, the original recipe called for nuts, but I didn't have any on hand, so I left them out. I can imagine that the addition of nuts would only enhance the texture of the bread. Go with your gut here--nuts or no nuts, you will love this bread.
Strawberry Sour Cream Bread
adapted from Closet Cooking who got the recipe from Joy of Baking
Ingredients
1/2 cup unsalted butter, softened
3/4 cup granulated white sugar
3 large eggs
1 teaspoon vanilla extract
2 cups all-purpose flour
1/2 teaspoon baking powder
1/2 teaspoon baking soda
1/4 teaspoon salt
1 teaspoon ground cinnamon
1/2 cup sour cream
1/2 cup pecans or walnuts (optional)
2 cups fresh strawberries
Using a stand mixer, cream the butter and sugar. Add the eggs one at a time, beating each in until the egg is incorporated before adding the next. Beat in the vanilla.
In a separate bowl, mix the flour, baking powder, baking soda, salt, and cinnamon. With the mixer on low, add 1/3 of the dry ingredients. When that is just mixed in, add 1/2 of the sour cream. Repeat with 1/3 of the dry ingredients, then the other half of the sour cream, and the final 1/3 of the dry ingredients. Be careful not to overmix. Fold in the strawberries and optional nuts.
Pour the batter into a greased and floured 9x5 loaf pan. Bake in a preheated 350 degree F oven for 60 minutes until the top is golden brown and a toothpick poked into the center will come out clean.
Allow to cool for 10 minutes in the pan and 5-10 minutes on a wire rack before slicing.
6.04.2010
The Pizza Dough Revelation
Promise not to leave my blog if I tell you a secret?
:deep breath:
weusuallybuypizzadoughinacan.
I feel better now that it's out there. The truth is when we want pizza we prefer to just make our own. I like spices on my pizza, but delivery (or Digiorno) can be a little too...much. Occasionally I will leave work late and I know Tim will be hungrily waiting for me so I pick up a $5 pizza from Little Caesars. Those times are rare, though, because we always plan out our menus for the whole week and if we don't follow it food will spoil. I'm never one to waste anything so we do our best to keep up with the menu.
Lately, I've felt inspired in the kitchen to try out new things and leave our habits of cheap convenience behind us. I have mentioned that meals at our house these days are often experimental. I like to try out new techniques, new ways to eat chicken, new flavor combinations. Tim is eating better for it, even if he won't admit it!
My latest challenge was to make pizza dough. That may not seem to challenging to others, as I have asked many acquaintances about it and they offhandedly say, "I always make my own dough." Am I the last one to make my own pizza dough? It can't be true. I know some swear by Trader Joe's frozen dough so there are definitely some other corner cutters out there.
I want to know what is so special about homemade pizza dough and if it is really worth it. I've decided I'm going to try several, document them here, and then compare them to one another, allowing you, my (devoted?) reader, to also have an opportunity to try out some new recipes for pizza dough. Therefore, if you have a recipe you'd like me to try (something that is tried and true at your house?), send it my way! Or if there is a frozen brand that you think beats all homemade dough, please also tell me about it!
The first recipe in my pizza dough challenge was from Emeril Lagasse. I chose this recipe because it appeared to have the simplest (and fewest) ingredients and seemed the most difficult to screw up.
The first step is to activate the yeast. Seems simple enough, right?
On my first try I combined the active dry yeast, sugar, and 110 degree water in the mixer bowl and waited. Nothing happened. I panicked. Ugh, I had already screwed it up. But how? My guess is that the bowl was too cold, and cooled down the water immediately. That didn't occur to me right away so I decided to mix some yeast with 110 degree water and leave out the sugar. I didn't really want a sweet dough, anyway. Nothing happened. When that didn't work, I called my husband and begged him to tell me the secret of activating yeast. He said the water has to be the right temperature and the sugar is important because it wakes up the yeast. I checked this out and he's right: the sugar is food for the yeast. Smart man, I married. Well, smart and he also worked in a bakery for a while!
Soldiering on (more than 45 minutes had passed by this time), I warmed a cup of water up again, leaving it in the same cup that I warmed it in, and added the yeast and a teaspoon of granulated sugar. After a good stir, I waited, my nose practically at the lip of the cup, daring the yeast to make a move.
And it did. What first looked like air bubbles began to come up to the surface of the yeast mixture. Then I realized I could see the granules of yeast popping up the surface and a slight foam collecting on the top of the mixture. It's alive! It's aliiiiive!
I waited about 3 or 4 minutes until I was sure that I wasn't going to ruin it (when in actuality, I probably could have moved on as soon as the yeast had been tested to show it was active) and then I added it to my mixer bowl. Then I began adding the flour in increments, as well as the salt. The trick is to add the flour until it just incorporates with the wet ingredients, and then add more. I felt after I had added the 3 cups of floor that the dough wasn't quite coming together as it should. I added a few teaspoons of water, just until it incorporated, and it really came together nicely.
Then I had to wait for it to rise. The wait was an epic nail biter. I didn't feel like I had any space in my kitchen that was "warm and draft free" so I opted for warming the oven to 200 degrees and then turning it off. I filled a glass pie plate with hot water and put it in the bottom rack of the oven. Then I put the dough in an oiled glass bowl and covered it with saran wrap and a towel and put that on the top rack of the oven.
Then I waited an hour. I didn't even peak once. And guess what? It rose. This recipe calls for a second rise, so after I took it out of the bowl, punch it down, cut it in half and shaped it into two round balls, and covered those in saran wrap, I had to leave them out on the counter for another 20 minutes. The result was a puffy, light dough that easily rolled out to two 10-inch thin crust pizzas.
We topped one with olive oil, shredded fontina, crumbled goat cheese, fresh basil, and halved cherry tomatoes.
For the second one, we went traditional: home made red sauce, shredded mozzarella, and pepperoni.
As I took a bite into a slice of the pizza, I had a revelation: with the simple flavors of the crust, the flavors of the pizza really stand out. It was like getting back to pizza, and it's the same way I felt when I ate at Dewey's Pizza for the first time. There was no hiding behind extra seasonings and garlic butter slathered all over every bite--it was about the ingredients.
As far as it comparing to the pizza dough in a can? It blew it out of the water. My biggest complaint about the canned dough was that it was too sweet. It lent too much to the overall pizza flavor, and always bothered me. I also think it's too thin and flat--no dimension to the texture. The home made pizza dough was light and puffy, but still crisp on the bottom--a perfect balance.
Tim says it was the best pizza he's ever had. He may be biased, considering he loves me, but I must agree--there is a difference.
Emeril Lagasse's Basic Pizza Dough
adapted from foodnetwork.com
Ingredients
1 package active dry yeast
1 cup water at 110 degrees F
1 tsp sugar
1 1/2 tsp salt
3 cups all purpose flour, plus more for spreading on the counter to keep dough from sticking
1 tbsp olive oil
In a bowl, combine warmed water, yeast, and sugar and mix well. Set aside until foamy, about 5 minutes. Add the yeast mixture, salt, and 1 cup of the flour to a bowl and set bowl under stand mixer. With the dough hook, turn mixer on low and mix for 60 seconds. Add 1 cup of the flower and mix for another 60 seconds. Add the last 1 cup of the flour and mix until the flour is mostly incorporated into a ball, turning up the mixer after 2 minutes and mixing for an additional 3-5 minutes. Dough should be incorporated into a ball. If necessary add additional water or olive oil, 1 tsp at a time, while mixing for the last 3-5 minutes until dough comes together to be a smooth elastic ball. If you feel that you need to move the dough to the counter and knead by hand to get the flour to combine, that will also work.
Preheat your oven to 200 degrees F and then turn off. Set a pan of water on the bottom rack to encourage a warm, moist environment. Oil a large bowl and transfer the dough to the bowl. Turn the dough over once to coat the dough in oil. Cover the bowl with saran wrap and a towel and set on the top rack of the oven. Let rise for 1 hour.
After an hour, remove the dough from the bowl and set on a lightly floured surface. Using your fist, punch down the dough, and then cut the dough in half and create two small rounds, which will make two 10-14 inch pizzas, depending on how much you roll them out. Cover the dough rounds with a damp towel or saran wrap and allow them to sit for 15 minutes, in which they will go through a second rising.
Put a pizza stone in the oven and preheat your oven to 450 degrees F. Roll out the dough to your desired size and thickness. You can either par-bake the dough for 6 minutes and then add toppings, and then bake for another 8-10 minutes, or top pizza with toppings and bake for 12-18 minutes. I have found I get a crisper crust if I par-bake the dough first.
:deep breath:
weusuallybuypizzadoughinacan.
I feel better now that it's out there. The truth is when we want pizza we prefer to just make our own. I like spices on my pizza, but delivery (or Digiorno) can be a little too...much. Occasionally I will leave work late and I know Tim will be hungrily waiting for me so I pick up a $5 pizza from Little Caesars. Those times are rare, though, because we always plan out our menus for the whole week and if we don't follow it food will spoil. I'm never one to waste anything so we do our best to keep up with the menu.
Lately, I've felt inspired in the kitchen to try out new things and leave our habits of cheap convenience behind us. I have mentioned that meals at our house these days are often experimental. I like to try out new techniques, new ways to eat chicken, new flavor combinations. Tim is eating better for it, even if he won't admit it!
My latest challenge was to make pizza dough. That may not seem to challenging to others, as I have asked many acquaintances about it and they offhandedly say, "I always make my own dough." Am I the last one to make my own pizza dough? It can't be true. I know some swear by Trader Joe's frozen dough so there are definitely some other corner cutters out there.
I want to know what is so special about homemade pizza dough and if it is really worth it. I've decided I'm going to try several, document them here, and then compare them to one another, allowing you, my (devoted?) reader, to also have an opportunity to try out some new recipes for pizza dough. Therefore, if you have a recipe you'd like me to try (something that is tried and true at your house?), send it my way! Or if there is a frozen brand that you think beats all homemade dough, please also tell me about it!
The first recipe in my pizza dough challenge was from Emeril Lagasse. I chose this recipe because it appeared to have the simplest (and fewest) ingredients and seemed the most difficult to screw up.
The first step is to activate the yeast. Seems simple enough, right?
On my first try I combined the active dry yeast, sugar, and 110 degree water in the mixer bowl and waited. Nothing happened. I panicked. Ugh, I had already screwed it up. But how? My guess is that the bowl was too cold, and cooled down the water immediately. That didn't occur to me right away so I decided to mix some yeast with 110 degree water and leave out the sugar. I didn't really want a sweet dough, anyway. Nothing happened. When that didn't work, I called my husband and begged him to tell me the secret of activating yeast. He said the water has to be the right temperature and the sugar is important because it wakes up the yeast. I checked this out and he's right: the sugar is food for the yeast. Smart man, I married. Well, smart and he also worked in a bakery for a while!
Soldiering on (more than 45 minutes had passed by this time), I warmed a cup of water up again, leaving it in the same cup that I warmed it in, and added the yeast and a teaspoon of granulated sugar. After a good stir, I waited, my nose practically at the lip of the cup, daring the yeast to make a move.
And it did. What first looked like air bubbles began to come up to the surface of the yeast mixture. Then I realized I could see the granules of yeast popping up the surface and a slight foam collecting on the top of the mixture. It's alive! It's aliiiiive!
I waited about 3 or 4 minutes until I was sure that I wasn't going to ruin it (when in actuality, I probably could have moved on as soon as the yeast had been tested to show it was active) and then I added it to my mixer bowl. Then I began adding the flour in increments, as well as the salt. The trick is to add the flour until it just incorporates with the wet ingredients, and then add more. I felt after I had added the 3 cups of floor that the dough wasn't quite coming together as it should. I added a few teaspoons of water, just until it incorporated, and it really came together nicely.
Then I had to wait for it to rise. The wait was an epic nail biter. I didn't feel like I had any space in my kitchen that was "warm and draft free" so I opted for warming the oven to 200 degrees and then turning it off. I filled a glass pie plate with hot water and put it in the bottom rack of the oven. Then I put the dough in an oiled glass bowl and covered it with saran wrap and a towel and put that on the top rack of the oven.
Then I waited an hour. I didn't even peak once. And guess what? It rose. This recipe calls for a second rise, so after I took it out of the bowl, punch it down, cut it in half and shaped it into two round balls, and covered those in saran wrap, I had to leave them out on the counter for another 20 minutes. The result was a puffy, light dough that easily rolled out to two 10-inch thin crust pizzas.
We topped one with olive oil, shredded fontina, crumbled goat cheese, fresh basil, and halved cherry tomatoes.
For the second one, we went traditional: home made red sauce, shredded mozzarella, and pepperoni.
As I took a bite into a slice of the pizza, I had a revelation: with the simple flavors of the crust, the flavors of the pizza really stand out. It was like getting back to pizza, and it's the same way I felt when I ate at Dewey's Pizza for the first time. There was no hiding behind extra seasonings and garlic butter slathered all over every bite--it was about the ingredients.
As far as it comparing to the pizza dough in a can? It blew it out of the water. My biggest complaint about the canned dough was that it was too sweet. It lent too much to the overall pizza flavor, and always bothered me. I also think it's too thin and flat--no dimension to the texture. The home made pizza dough was light and puffy, but still crisp on the bottom--a perfect balance.
Tim says it was the best pizza he's ever had. He may be biased, considering he loves me, but I must agree--there is a difference.
Emeril Lagasse's Basic Pizza Dough
adapted from foodnetwork.com
Ingredients
1 package active dry yeast
1 cup water at 110 degrees F
1 tsp sugar
1 1/2 tsp salt
3 cups all purpose flour, plus more for spreading on the counter to keep dough from sticking
1 tbsp olive oil
In a bowl, combine warmed water, yeast, and sugar and mix well. Set aside until foamy, about 5 minutes. Add the yeast mixture, salt, and 1 cup of the flour to a bowl and set bowl under stand mixer. With the dough hook, turn mixer on low and mix for 60 seconds. Add 1 cup of the flower and mix for another 60 seconds. Add the last 1 cup of the flour and mix until the flour is mostly incorporated into a ball, turning up the mixer after 2 minutes and mixing for an additional 3-5 minutes. Dough should be incorporated into a ball. If necessary add additional water or olive oil, 1 tsp at a time, while mixing for the last 3-5 minutes until dough comes together to be a smooth elastic ball. If you feel that you need to move the dough to the counter and knead by hand to get the flour to combine, that will also work.
Preheat your oven to 200 degrees F and then turn off. Set a pan of water on the bottom rack to encourage a warm, moist environment. Oil a large bowl and transfer the dough to the bowl. Turn the dough over once to coat the dough in oil. Cover the bowl with saran wrap and a towel and set on the top rack of the oven. Let rise for 1 hour.
After an hour, remove the dough from the bowl and set on a lightly floured surface. Using your fist, punch down the dough, and then cut the dough in half and create two small rounds, which will make two 10-14 inch pizzas, depending on how much you roll them out. Cover the dough rounds with a damp towel or saran wrap and allow them to sit for 15 minutes, in which they will go through a second rising.
Put a pizza stone in the oven and preheat your oven to 450 degrees F. Roll out the dough to your desired size and thickness. You can either par-bake the dough for 6 minutes and then add toppings, and then bake for another 8-10 minutes, or top pizza with toppings and bake for 12-18 minutes. I have found I get a crisper crust if I par-bake the dough first.
Subscribe to:
Posts (Atom)